9. Utilisation des données d’audit dans les plugins pour la conformité des paquets WAPT et pour les services externes  
9.1. Afficher les données d’audit de la machine dans la Console WAPT  
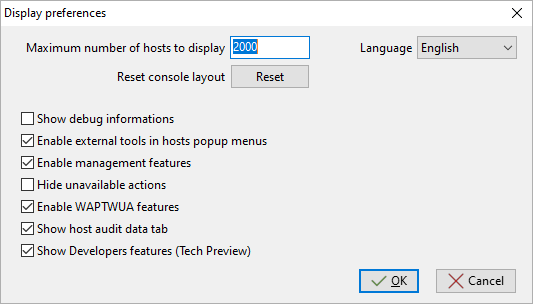
Vous pouvez gérer la sortie d’audit et afficher le résultat de l’audit si vous activez l’option dans l’onglet . Cochez l’option Afficherl’onglet des données d’audit de la machine pour voir l’onglet Données d’audit sur chaque client.

Fenêtre affichant les préférences avancées
Pour utiliser les audits dans les paquets WAPT, visitez cette page pour gérer les données d’audit.
9.1.1. Afficher les données chiffrées avec un certificat dans l’onglet des données d’audit
Avec la fonction d’audit, il est possible de chiffrer les données sensibles provenant de machines distantes ; il sera possible de lire les données sensibles chiffrées avec un certificat installé sur la machine de l’administrateur WAPT. De cette façon, le Serveur WAPT peut déposer des données sensibles d’inventaire sans que le serveur devienne un bien sensible.
Cette méthode est particulièrement utile par exemple pour gérer en toute sécurité les mots de passe aléatoires LAPS dans WAPT.
Dans setup.py, vous pouvez utiliser une fonction pour chiffrer des données avec un certificat. Si vous disposez de la clé privée correspondant au certificat utilisé pour chiffrer les données, celles-ci seront déchiffrées et apparaîtront sous une forme lisible.
Voici un exemple de code :
# -*- coding: utf-8 -*-
from setuphelpers import *
from waptcrypto import print_encrypted_data

def audit():
  randompassword = '1234'
  print_encrypted_data(randompassword, glob.glob('*.crt'))
Ce code va chiffrer le mot de passe 1234 avec tous les certificats présents sur la machine qui est utilisée pour gérer WAPT. Depuis la Console WAPT, vous verrez dans l’onglet Données d’audit la version chiffrée et vous pourrez déchiffrer les données avec la clé privée associée au certificat public qui a été utilisé pour chiffrer les données.

9.2. Synchroniser les inventaires de WAPT vers GLPI  
9.2.1. Principe de fonctionnement
WAPT Enterprise propose une synchronisation entre les inventaires de vos postes et le logiciel GLPI , un ITSM.
Cette méthode synchronise automatiquement les changements sur votre parc informatique avec le serveur GLPI.
WAPT peut se synchroniser avec GLPI 10 en utilisant l’API JSON native. WAPT peut se synchroniser avec GLPI version 9.x en utilisant le plugin FusionInventory au format XML.
Attention
GLPI par WAPT ne fonctionne pas avec l’authentification Kerberos pour GLPI.
Si vous utilisez Kerberos pour GLPI, excluez glpi/plugins/fusioninventory/ de l’authentification Nginx.
Avertissement
Si vous rencontrez des problèmes avec le serveur GLPI qui ne reçoit pas certaines parties des inventaires, vous pouvez installer le paquet tis-audit-glpi-inventory sur les clients. De cette façon, vous obtiendrez l’inventaire officiel de GLPI.
9.2.2. Installer les dépendances requises pour GLPI 9.x
Afin de recevoir des inventaires sur le serveur GLPI, le plugin FusionInventory devra être installé sur le serveur GLPI. Ceci n’est pas nécessaire pour GLPI 10 qui a sa propre API JSON native.
Note
Vous pouvez suivre ce guide pour installer FusionInventory.
Après avoir installé FusionInventory sur votre serveur GLPI, vous aurez un point d’accès sur votre Serveur WAPT pour envoyer les inventaires vers :
http:/glpi.mydomain.lan/glpi/plugins/fusioninventory/
9.2.3. Configuration de l’Agent WAPT et du paquet de synchronisation
Installez et configurez l’Agent WAPT sur l’ordinateur qui exécutera la synchronisation. L’Agent WAPT est installé par défaut sur le Serveur WAPT, il suffit de le configurer.
Pour configurer l’Agent WAPT, veuillez vous référer à la documentation correspondante.
Ensuite, vous devez installer le paquet de synchronisation de GLPI :
pour GLPI 9.x, vous devez installer le paquet tis-glpi-plugin-export-to-glpi9
pour GLPI 10.x, vous devez installer le paquet tis-glpi-plugin-export-to-glpi10
Vous devez configurer une planification d’audit sur l’agent
[global]
...
waptaudit_task_period=120m
...
Avec le paquet choisi, il créera deux fichiers ini dans votre $WAPT_INSTALL_DIR/private (linux : /opt/wapt/private, windows : C:Program Files (x86)waptprivate`). Connectez-vous à l’hôte et modifiez les fichiers glpi.ini et wapt_api.ini.
Pour GLPI9 :
[glpi]
username = glpi
password = xxxxxxx
url = https://glpi.xx.xxxxx.xx/plugins/fusioninventory/
Pour GLPI10 :
[glpi]
username = glpi
password = xxxxxxx
url = https://glpi.xx.xxxxx.xx/front/inventory.php
Pour GLPI10, veuillez également vous assurer que l’inventaire est activé.
Pour GLPI9 et GLPI10 :
[wapt]
username = waptregister
password = waptregister2023!
url = https://srvwapt.ad.tranquil.it
Pour tester la configuration actuelle, vous pouvez déclencher un audit
wapt-get audit tis-glpi-plugin-export-to-glpi9
# or
wapt-get audit tis-glpi-plugin-export-to-glpi10
9.2.4. Éléments actuels envoyés par WAPT au serveur GLPI
Valeur |
Envoyé |
Non Envoyé |
|---|---|---|
Nom de l’ordinateur |
||
Nom d’utilisateur |
||
Description |
||
Nom de l’OS |
||
Version de l’OS |
||
Langue |
||
CPU |
||
Mémoire |
||
Batterie |
||
Type de châssis |
||
Physique ou virtuel |
||
Configuration de la carte réseau |
||
Liste d’imprimante et les propriétés |
||
Logiciel installé [1] |
||
Lecteur réseau |
||
Variables d’environnement [2] |
||
Modèles des écrans |
||
Modèle de la souris et du clavier |
||
Modèles des cartes contrôleurs (excepté la carte graphique) |
||
Version de l’antivirus |
||
État du pare-feu |
||
Liste groupe local |
||
Liste et état de la banque de mémoire |
||
Liste des ports USB et des périphériques connectés |
||
Statut de l’imprimante |
||
Lecteurs de carte |
||
Liste d’Appx à l’échelle du système |
Notes de bas de page
9.2.5. Erreurs possibles dans l’inventaire rapporté sur le serveur GLPI
Les inventaires téléchargés par le Serveur WAPT vers le serveur GLPI peuvent être incomplets ou comporter des erreurs par rapport aux inventaires téléchargés directement par l’agent FusionInventory déployé sur les hôtes. L’une des raisons est que WAPT vise à ne rapporter que les valeurs les plus importantes.
Si vous pensez que des éléments importants manquent ou sont signalés de manière erronée, veuillez signaler le problème à l’équipe de développement de Tranquil IT.
Pour le rapport, l’équipe de développement a besoin de 2 fichiers .xml.
Tout d’abord, installez l’agent FusionInventory sur l’ordinateur sur lequel vous observez un élément d’inventaire manquant ou déclaré à tort.
Exécutez l’agent FusionInventory et extrayez le rapport dans un fichier
.xml.
"C:\Program Files\FusionInventory-Agent\fusioninventory-inventory" > %TEMP%\inventory.xml
fusioninventory-inventory > /tmp/inventory.xml
fusioninventory-inventory > /tmp/inventory.xml
Définissez le répertoire de débogage dans le fichier waptserver.ini.
glpi_inventory_debug_directory = /tmp/glpi
Redémarrez le Serveur WAPT
Récupérer le fichier
/tmp/glpi/UUID.xmldu Serveur WAPT, l’UUID étant l’identifiant de l’hôte.Envoyez les 2 fichiers à l’équipe de développement.
9.3. Synchronisation des inventaires WAPT avec Cyberwatch pour les failles de sécurité  
9.3.1. Principe de fonctionnement
WAPT Enterprise offre une synchronisation entre les inventaires de vos hôtes et le logiciel Cyberwatch <https://cyberwatch.fr/>, un ISVM.
La méthode synchronise automatiquement les informations sur les mises à jour ou les logiciels installés avec l’outil Cyberwatch afin d’analyser les vulnérabilités détectées et de vous en avertir.
9.3.2. Configuration de Cyberwatch côté serveur
Connectez-vous à votre serveur Cyberwatch et accédez à votre profil.
Dans la section API, cliquez sur Voir mes clés API.
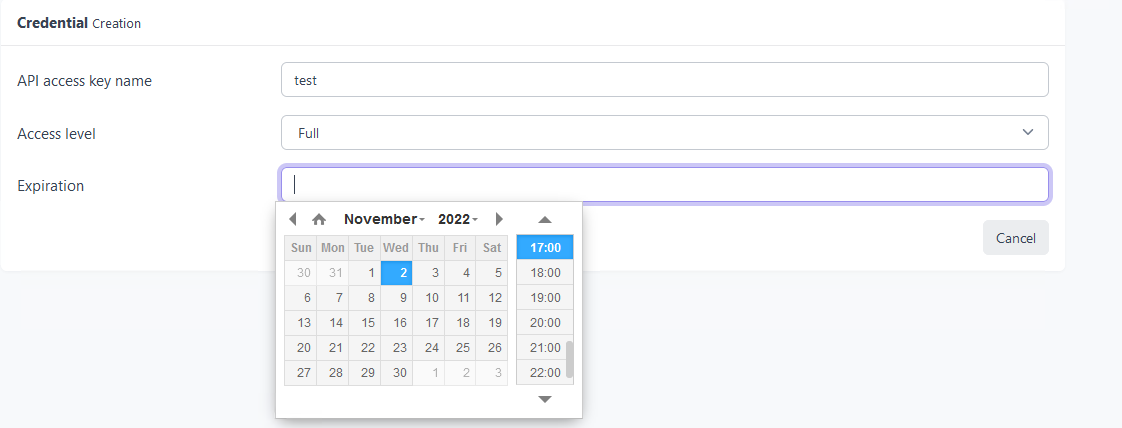
Cliquez sur Add et nommez votre clé d’accès à l’API pour WAPT.

Définissez le niveau d’accès sur Full et indiquez une date d’expiration. Si vous n’en donnez pas, la clé n’expirera jamais.
Cette clé avec son ID de clé d’accès à l’API vous permettra d’utiliser l’API Cyberwatch pour notre paquet WAPT.
9.3.3. Configuration de l’Agent WAPT et du paquet de synchronisation
Installez et configurez l’Agent WAPT sur l’ordinateur qui exécutera la synchronisation. L’Agent WAPT est installé par défaut sur le Serveur WAPT, il suffit de le configurer.
Pour configurer l’Agent WAPT, veuillez vous référer à la documentation correspondante.
Vous pouvez avoir deux paquets :
si vous avez l’agent Cyberwatch, vous pouvez importer de Cyberwatch en installant le paquet tis-cyberwatch-plugin-import-from-cyberwatch, cela vous donnera des informations directement sur votre Console WAPT.
pour les appareils sans agent, vous pouvez toujours exporter vers votre serveur Cyberwatch les informations de vos hôtes WAPT en installant le paquet tis-cyberwatch-plugin-export-to-cyberwatch-airgap, il vous donnera des informations sur votre console Cyberwatch sans que l’agent Cyberwatch ne soit installé.
Vous devez configurer une planification d’audit sur l’agent
[global]
...
waptaudit_task_period=120m
...
Avec le paquet, quel que soit votre choix (vous pouvez évidemment choisir les deux), il créera deux fichiers ini dans votre $WAPT_INSTALL_DIR/private (linux : /opt/wapt/private, windows : C:Program Files (x86)waptprivate`). Connectez-vous à l’hôte et modifiez les fichiers cyberwatch_api.ini et wapt_api.ini.
[cyberwatch]
api_key =
secret_key =
url = https://cyberwatch.mydomain.lan
[wapt]
username = waptregister
password = waptregister2023!
url = https://srvwapt.ad.tranquil.it
Pour tester la configuration actuelle, vous pouvez déclencher un audit
wapt-get audit tis-cyberwatch-plugin-import-from-cyberwatch
# and/or
wapt-get audit tis-cyberwatch-plugin-export-to-cyberwatch-airgap