3. Using the WAPT Console advanced features
This page details the advanced use of the WAPT Console.
3.1. Using Organizational Unit packages in WAPT  
3.1.1. Working principle
WAPT Enterprise offers Organizational Unit package functionality.
unit packages automate software and configuration installations based on the Active Directory tree. It is a very powerful feature when used properly.
Unit packages are not explicitly assigned to the host (i.e. as dependencies in the host package) but are implicitly taken into account by the WAPT agent dependency engine during the WAPT upgrade.
Note
If the computer is removed from an Organizational Unit, obsolete unit packages are removed.
The WAPT Agent is aware of its position in the Active Directory tree structure, therefore it knows the hierarchy of Organizational Units that concerns it, for example:
DC=ad,DC=mydomain,DC=lan
OU=Paris,DC=ad,DC=mydomain,DC=lan
OU=computers,OU=Paris,DC=ad,DC=mydomain,DC=lan
OU=service1,OU=computers,OU=Paris,DC=ad,DC=mydomain,DC=lan
If a unit package is defined on each Organisational Unit level, the WAPT Agent will automatically download WAPT packages and configurations that are attached to each level. Using inheritance, WAPT will apply WAPT packages and dependencies that are attached to each Organizational Unit.
3.1.2. Creating Organizational Unit packages
You can create unit packages by .
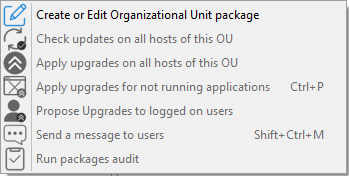
A window opens and you are prompted to choose which packages to include in the unit bundle.
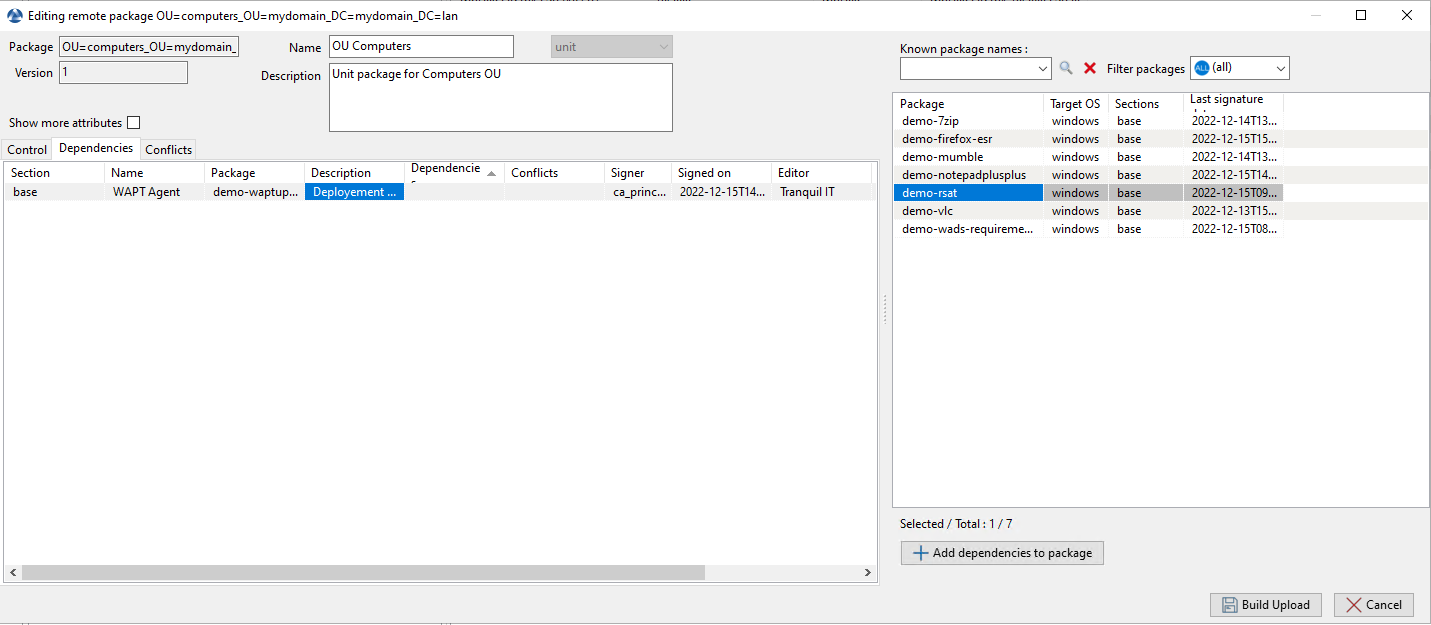
Adding WAPT packages to a unit bundle
Save the WAPT package and it will be deployed to all hosts belonging to the selected OU.
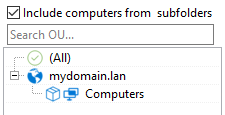
When you have a unit bundle, you will see a cube before the OU name in the WAPT Console.
3.1.3. Actions available with Organizational Units

Menu item |
Description |
|---|---|
The Create or Edit Organizational Unit package menu item |
Visit this documentation for more details on creating or editing OU packages. |
The Check updates on all hosts of this OU menu item |
Allows to upload the current state of the host to the WAPT Server and force the WAPT Server to display whether the hosts in the selected OU have pending updates. |
The Apply upgrades on all hosts of the OU menu item |
Allows to apply waiting WAPT updates and upgrades on the all hosts in the OU. |
Note
You may filter how hosts are displayed based on the Active Directory OU they belong to.

The checkbox Include hosts in subfolders allows to display hosts in subfolders.
3.1.4. Faking Organizational Units for WORKGROUP hosts
It can happen that some specific hosts cannot be joined to an Active Directory domain.
Therefore, these hosts do not show up in the Active Directory Organizational Units in the WAPT Console.
To make all hosts show up in the WAPT Console under the right Organizational Unit, whether they are joined to an AD domain or not, WAPT allows to specify a fake Organizational Unit in the WAPT Agent configuration file.
The benefits of this very useful trick are:
You can manage out-of-domain, workgroup and Windows Home Edition hosts with WAPT as if they were joined to the Active Directory.
Out-of-domain, workgroup and Windows Home Edition hosts are now showing up in the Active Directory tree view in the WAPT Console.
To setup a fake Organizational Unit on hosts, create an Host agent dynamic configuration, then go to Advanced Editing > host_organizational_unit_dn.
fill in the field with the syntaxe for example :
OU=WINDOWS,OU=WORKSTATION,DC=FAKE,DC=LAN
Example :

Fake OU creation
Once the package has been validated, it can be allocated to a machine or an OU.
3.2. Customizing the columns
By using the right-click context menu on the column bar, you can choose which columns you want to show or hide.
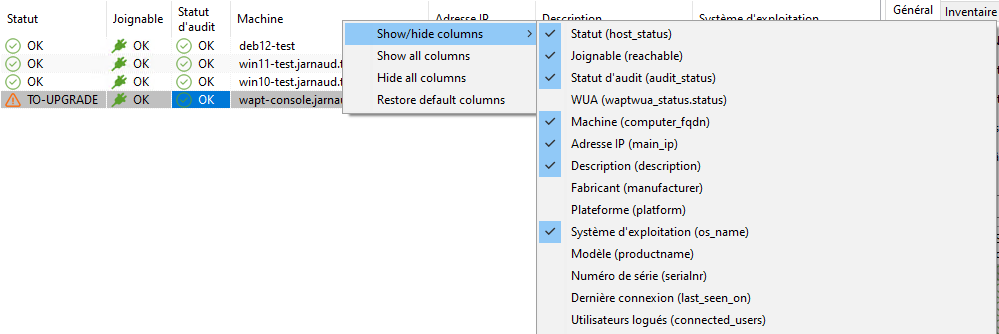
Column management in the WAPT Console
3.2.1. How to rename grids
From the console, go to view , then Display preferences.
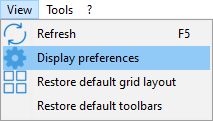
Wapt console display preferences
Then, check enable advanced display and grid features and Show Developers features.
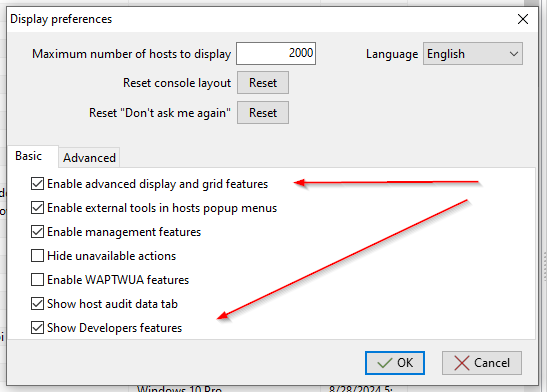
waptconsole display preferences
Return to the wapt console, and right-click on a machine in the inventory. Select Advanced customize of table.
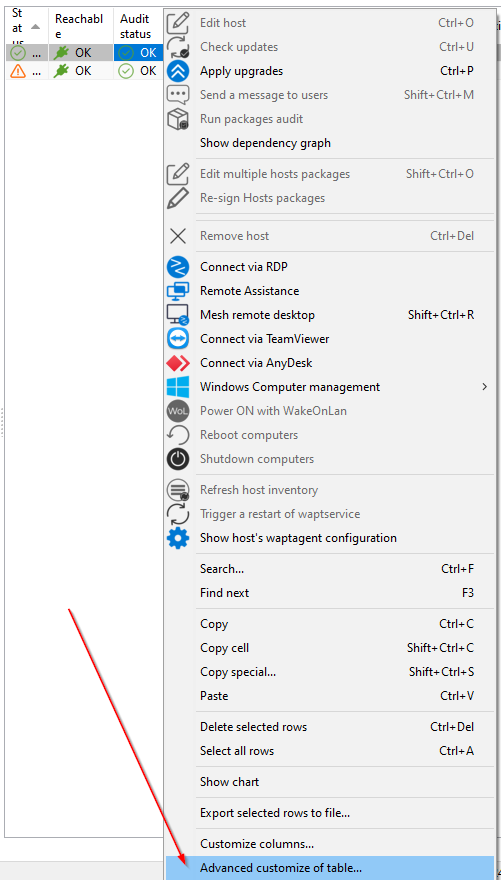
Advanced grids configurations
Select a column and access its name.
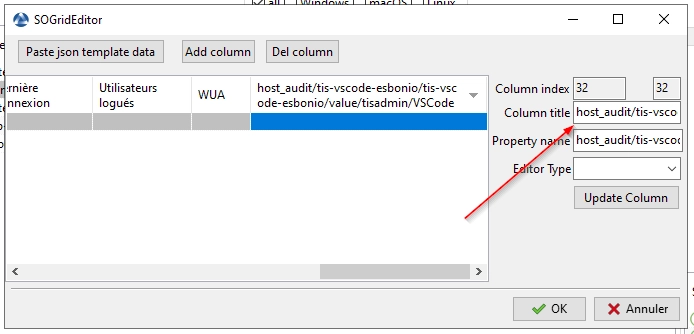
Change column name
3.3. Forcing WAPT package installation
Forced installation refers to re-executing the setup.py script of a WAPT package, even if the package is already marked as installed on the system.
Why Use Forced Installation ?
A forced installation can verify that any outdated configuration or remnants from a previous version of the package have been properly removed.
If a package is installed but corrupted, reinstallation ensures a fresh setup without requiring a version change.
WAPT typically relies on registry keys or other markers to determine if a package is installed. If these markers are present but the software is not functioning correctly, WAPT might skip reinstallation unless forced.
Warning
Forced installations should be performed carefully, as they may overwrite local configurations or disrupt ongoing processes.
Ensure that the potential impact is evaluated before proceeding.
How to force a package installation ?
For one computer :
Navigate to the Overview tab in the WAPT Console, right-click on the desired package and select Force_Install.
For multiple computer :
Go to the WAPT Packages section. Locate the package you want to force. Right-click on the package and select Edit_Package. Enable the Show More Attributes option. Set a past date in the Force Install Before field.
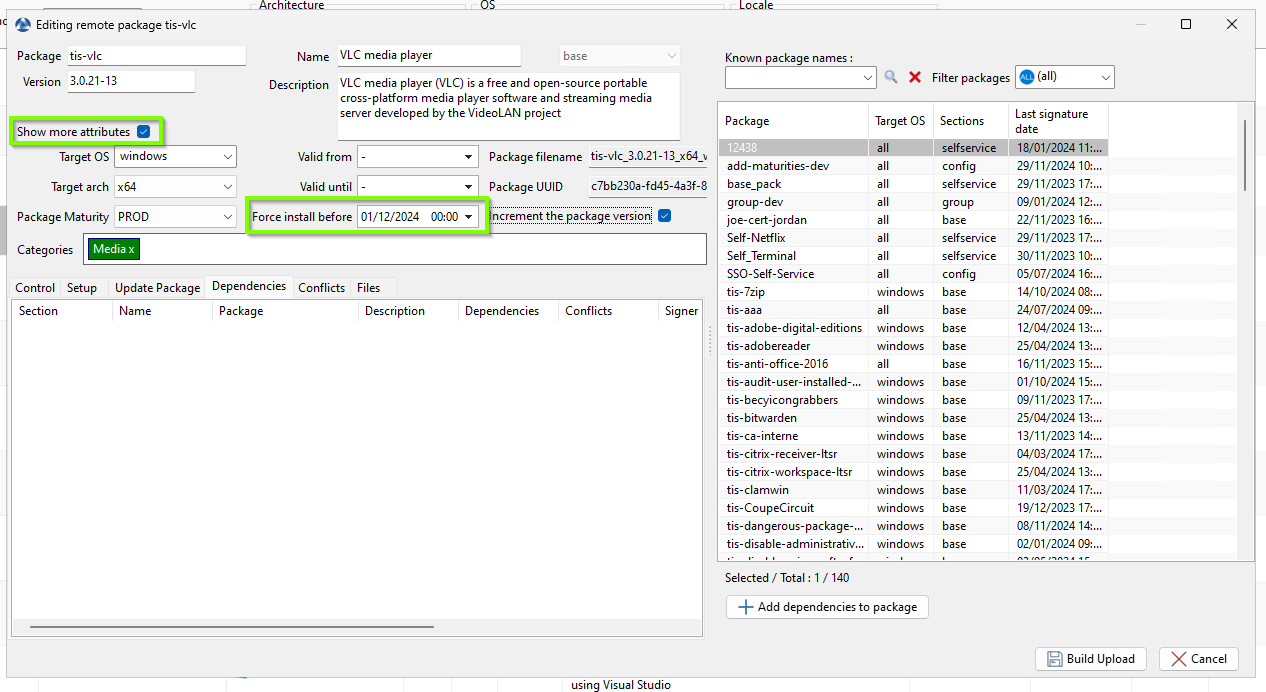
WAPT Console force a package
These actions will ensure the package is reinstalled on the targeted machines.
3.4. Multi-Factor Authentication by WAPT Console
The choice was made in favour of TOTP (Time-Based One-time Password). This is a temporary code generated by an algorithm and linked to the current time. The code is generated for thirty seconds.
Hint
It is important that your wapt server and the management consoles are in the same time because the TOTP generates a code every thirty seconds.
Note
Since the 2.6.0.16676, in the CSPN toe or if you add require_totp_for_admin option in the wapt-get.ini.
This applies to password-based authentication (admin, passwd, ldap, token).
Without require_totp_for_admin, admin rights are stripped unless TOTP is verified.
3.4.1. How to activate MFA
Go to .
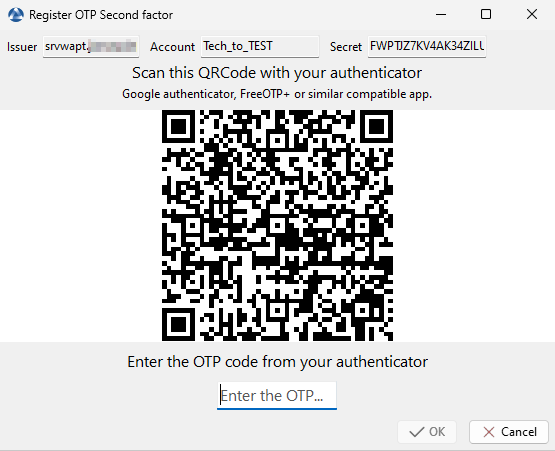
WAPT Console Activate TOTP
Use your second device (smartphone,YubiKey, etc.) and get the code who will appears in the picture. Put the code in the dedicated field.
A confirmation window appears showing ; 2FA OTP token set on your account.
You can restart your WAPT Console. Now the TOTP Code field appears in the window of authentication.
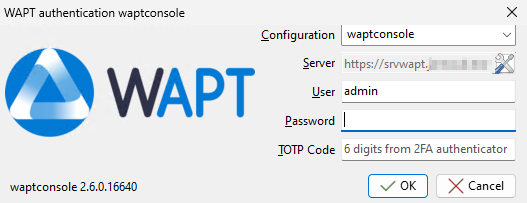
WAPT Console Authentification TOTP
3.4.2. How to disable MFA
You need to use an admin account. Go to . In the columns 2FA, do a right-click Remove 2FA.
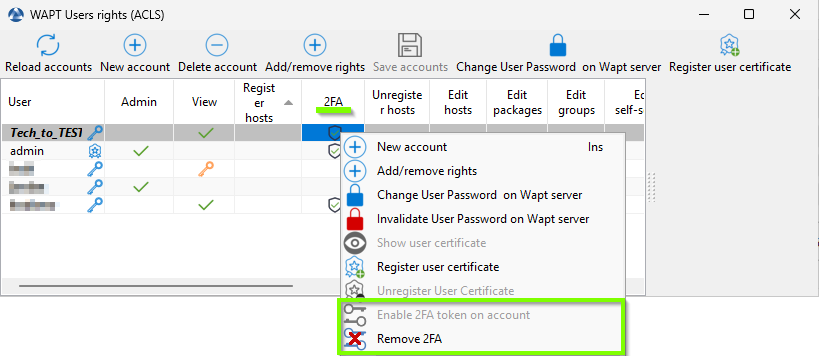
WAPT console ACL Users 2FA
Note
When activating TOTP, you need to take into account certain changes in behaviour:
When connecting to the WAPT server URL, the OTP (One-Time Password) code must be added between braces. Example: password{OTPcode}.
When registering a new agent machine, use the wapt-get register –with-otp command. Identify the login and password as password{OTPcode}.
3.5. Using profile bundles in WAPT  
3.5.1. Working principle
WAPT Enterprise offers an Active Directory profile bundle functionality.
The profile bundle automates the installation of WAPT packages and configuration packages on hosts based on their membership to Active Directory Computer Security Groups.
The WAPT Agent will report to the WAPT Server the Active Directory groups to which the host belongs.
If a profile package has the same name as an Active Directory group, then the WAPT agent will install automatically the profile package for the Active Directory group of which the host is a member.
If the host is no longer a member of its Active Directory group, then the matching profile package will be uninstalled.
Profile packages are stored in the web directory https://srvwapt.mydomain.lan/wapt/.
Profile packages are not explicitly assigned to the host (i.e. as dependencies in the host package) but are implicitly taken into account by the WAPT Agent dependency engine during WAPT upgrades.
Note
For performance reasons, this feature is enabled only if the use_ad_groups option is enabled in the wapt-get.ini configuration file of the WAPT Agent.
Important
The Active Directory Computers security groups and sub-groups contain Computers, not Users.
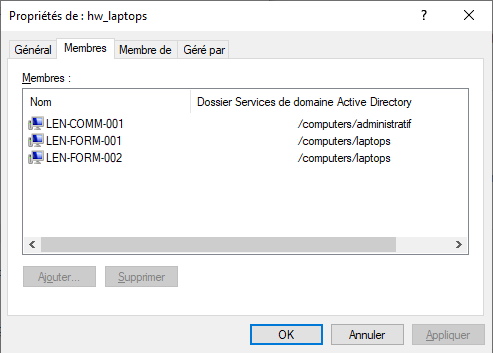
Window showing the Computers group in Active Directory
Warning
Automatically installing software and configurations based on user and user group membership is not implemented with WAPT and such implementation is not desirable. The use case of installing software based on user profile is better served with the differentiated self-service feature that is also available with WAPT Enterprise.
The name of the group MUST be lower case in Active Directory and in the WAPT Console.
3.5.2. Creating WAPT profile bundles in the WAPT Console
You can create profile bundle WAPT packages by clicking on .
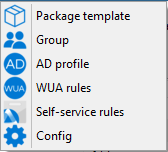
Important
Requirements:
The profile AD group name and the profile package MUST be all lower case.
Example:
AD Security group: hw_laptops;
WAPT profile bundle: hw_laptops.
A window opens and you are prompted to choose which WAPT packages are to be included in the newly created profile bundle.
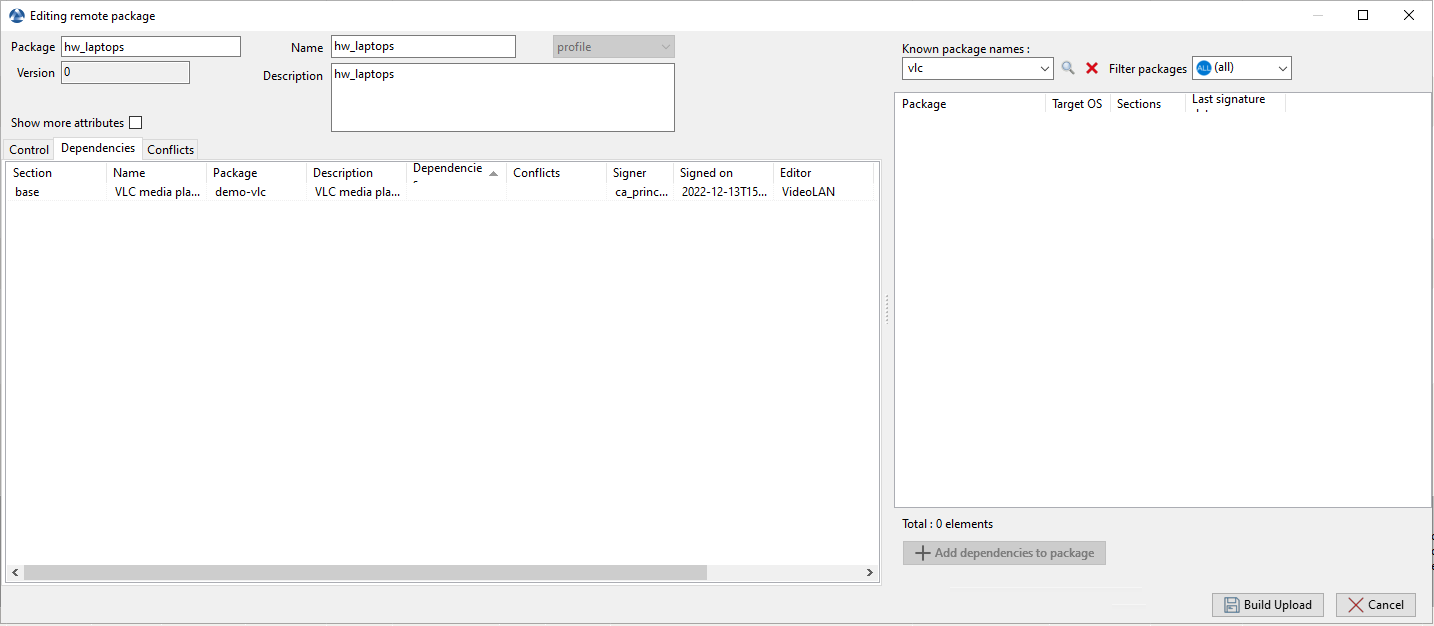
Adding WAPT packages to a profile bundle in the WAPT Console
Save the profile bundle and it will be uploaded to the WAPT Server.
3.6. Adding plugins in the WAPT Console
To add custom plugins, go to the Tab.
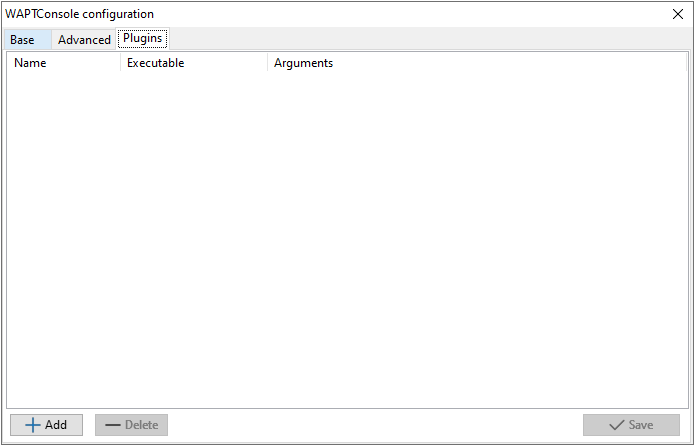
Creating a custom plugin in the WAPT Console
Click Add to add a plugin, then edit the corresponding columns.
Column |
Description |
|---|---|
Name |
Name that will appear in the menu. |
Executable |
Path of the executable that will be executed. |
Arguments |
Arguments passed to the executable. All the parameters that are diplayed in the grid can be used, like {ip}, {uuid} or {computer_fqdn}. To get the parameter name, you may right-click on the column header, and the name will be displayed in parentheses beside the column name. |
Plugins will then appear in the menu:
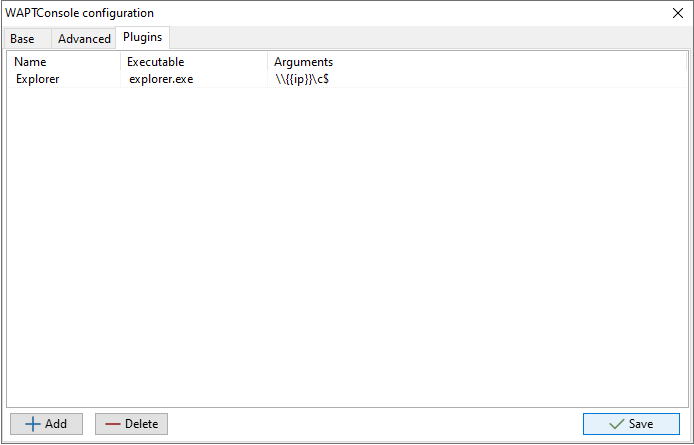
Creating a custom plugin in the WAPT Console
3.7. Managing several WAPT Server profiles in the WAPT Console  
You can connect the WAPT Console to several WAPT Servers.
To do so, go to %localappdata%waptconsole, copy the waptconsole.ini file and rename it, for example waptconsole2.ini.
Modify the new file with the second WAPT Server parameters (ex: IP / DNS, prefix, etc).
Then, when you re-open the WAPT Console, you can select one WAPT Server or the other.
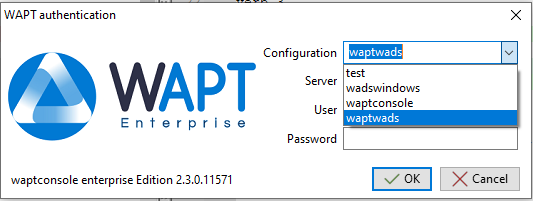
Window showing connections with several WAPT Server profiles
Note
You can have several WAPT Server connection profiles but the WAPT Servers do not communicate between them.
3.8. Using the WAPT System Tray utility
The WAPT System Tray utility is a systray program working in user context.
The WAPT System Tray utility launches at logon if you enable it with the following package: tis-enable-wapttray.
The icon will show up in the Windows tray toolbar.
One can also launch the WAPT System Tray utility manually on C:\Program Files (x86)\wapt\wapttray.exe.
3.8.1. Functionalities of the WAPT System Tray utility
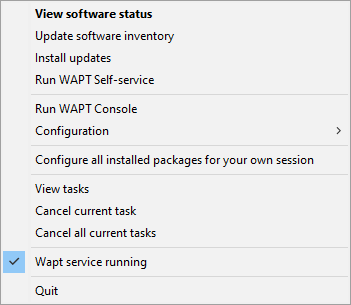
Action |
Description |
|---|---|
View software status |
Launches the local web interface in a web browser. |
Update software inventory |
Refreshes the list of available WAPT packages. Double-clicking on the tray icon brings about the same effect. |
Install updates |
Launches the installation of pending upgrades. |
Run WAPT Self-service |
Launches the WAPT Self-Service. |
Run WAPT Console |
Launches the WAPT Console. |
Configuration |
See following table for detailed list of options. |
Configuring all installed packages for your own session |
Launches a session-setup to configure user environment for all packages installed on the host. |
View tasks |
Display the task list on the local web interface in the web browser. |
Cancel current task |
Cancels a running task on WAPT Agent. |
Cancel all current tasks |
Cancels all running tasks on WAPT Agent. |
WAPT service running |
Stops and reloads the WAPT service. |
Quit |
Closes the tray icon without stopping the local WAPT service. |
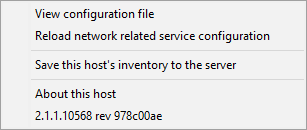
Action |
Description |
|---|---|
View configuration file |
Opens the |
Reload network related service configuration |
Reloads the connection to the WAPT Server in the event of a network reconfiguration. |
Save this host to the WAPT Server |
Updates the host’s inventory with the WAPT Server. |
About this host |
Launches the local web interface in a browser file with Local Administrator privileges (credentials may be asked) to display the host inventory. |
3.8.2. Video demonstration
3.9. Using the WAPT Exit utility
The WAPT Exit utility allows to upgrade and install WAPT packages when a host is shutting down, at the user’s request, or at a scheduled time.
The mechanism is simple. If WAPT packages are waiting to be upgraded, they will be installed.
The WAPT Exit method is very effective in most situation because it does not require the intervention of the User or the Administrator.
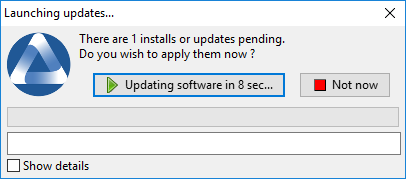
The WAPT Exit utility executes by default on shutdown, it is installed with the WAPT Agent.
The behavior of the WAPT Exit utility is customizable in wapt-get.ini of the WAPT Agent.
Warning
If a WAPT task is running, the shutdown of the host is suspended until the task has completed or timed-out.
The WAPT Exit utility can be manually executed by running C:\Program Files (x86)\wapt\waptexit.exe.
3.9.1. Triggering the WAPT Exit utility with a scheduled task  
One can deploy a GPO or a WAPT package that will trigger the WAPT Exit utility at a pre-scheduled time.
Triggering the WAPT Exit utility with a scheduled task is best suited for servers that are not shutdown frequently.
You may adapt the procedure describing how to deploy the WAPT Agent to trigger the WAPT Exit utility script at the most appropriate time.
You can use the following script for your scheduled task, adapted to your need:
waptpython -c "from waptservice.enterprise import start_waptexit start_waptexit('',{'only_priorities':False,'only_if_not_process_running':True, 'install_wua_updates':False,'countdown':300},'schtask')"
Warning
All running software that are upgraded may be killed with possible loss of data.
The WAPT Exit utility may fail to upgrade a software program if a software that you are upgrading is in the
impacted_processlist of thecontrolfile. See below for more information.The method of triggering the WAPT Exit utility at a scheduled time is the least recommended method for desktops. It is better to let the WAPT Exit utility execute at shutdown or on user request.
3.9.2. The WAPT Exit utility settings in wapt-get.ini
It is possible to modify the behavior of the WAPT Exit utility in the wapt-get.ini.
It is also possible to modify the behavior of the WAPT Exit utility directly from the command line, see the next points.
3.9.3. The WAPT Exit utility options with the command line
3.9.3.1. Avoiding the cancellation of upgrades
To disable the interruption of the installation of updates you can run the WAPT Exit utility with the argument:
waptexit.exe -allow_cancel_upgrade = True
3.9.3.2. Increasing the trigger time in the WAPT Exit utility
To specify the wait time before the automatic start of the installations you can start the WAPT Exit utility with the argument:
waptexit.exe -waptexit_countdown = 10000
3.9.3.3. Avoiding to interrupt user activity
To tell WAPT not to run an upgrade of software titles currently running on the host (impacted_process attribute of the WAPT package), the WAPT Exit utility may be run with the argument -only_if_not_process_running.
waptexit.exe -only_if_not_process_running = True
If not specified, the WAPT Exit utility will take the value indicated in C:\Program Files (x86)\wapt\wapt-get.ini.
3.9.3.4. Launching the installation of WAPT packages with a special level of priority
To tell WAPT to only upgrade WAPT packages with a specific priority, you can run the WAPT Exit utility with the argument -priorities.
waptexit.exe -priorities = high
3.9.3.5. Registering/ unregistering the WAPT Exit utility
To register or unregister the WAPT Exit utility in local shutdown group strategy scripts, use:
to enable the WAPT Exit utility at host shutdown:
wapt-get add-upgrade-shutdown
to disable the WAPT Exit utility at host shutdown:
wapt-get remove-upgrade-shutdown
3.9.3.6. Video demonstration
3.10. Customizing WAPT for better user acceptance  
It is possible to customize WAPT with your company colors to improve user acceptance.
3 components of WAPT are customizable:
the WAPT Exit utility;
the WAPT Self-Service;
the WAPT Message utility.
It is possible to use the same logo for all programs.
Place the image in <wapt_folder>\templates.
The logo MUST be named wapt-logo.png.
The recommended size of the logo is 200X55 and the recommended format is .png.
For a different logo per program, see next points.
3.10.1. The WAPT Exit utility
It is possible to customize the WAPT Exit utility by placing the image you want in <wapt_folder>\templates.
The logo MUST be named waptexit-logo.png.
The recommended size of the logo is 200X55 and the recommended format is .png.
If the file is not defined, WAPT uses by default wapt-logo.png.
3.10.2. WAPT Self-Service
It is possible to customize the WAPT Exit utility by placing the image you want in <wapt_folder>\templates.
The logo MUST be named waptself-logo.png
The recommended size of the logo is 200X55 and the recommended format is .png.
If it is not defined, WAPT uses in order waptexit-logo.png, waptself-logo.png and finally the default WAPT logo.
3.10.3. WAPT Message
It is possible to customize the WAPT Exit utility by placing the image you want in <wapt_folder>\templates.
The logo MUST be named waptmessage-logo.png.
The recommended size of the logo is 200X55 and the recommended format is .png.
If it is not defined, WAPT uses in order waptexit-logo.png, waptself-logo.png and finally the default WAPT logo.
3.11. Customizing the WAPT Console with its configuration file
Note
the WAPT Console configuration is stored in 2 locations:
C:\Users\%username%\AppData\Local\waptconsole\waptconsole.ini.C:\Users\%username%\AppData\Roaming\waptconsole\waptconsole.ini.
These files are automatically generated when the waptconsole is first launched and it is generated from the wapt-get.ini file configured on the Administrator’s workstation.
3.11.1. Description of available sections
Section |
Description |
|---|---|
|
Defines the global WAPT Console options. |
|
Defines external repository options.
|
|
Defines the WUA options. |
All sections are detailed below.
Others sections present on C:\Users\%username%\AppData\Roaming\waptconsole\waptconsole.ini are not editable manually, therefore they are not detailed.
Warning
For parameters both present in wapt-get.ini and waptconsole.ini, values are set in wapt-get.ini and copied to waptconsole.ini.
Do not edit manually these parameters.
3.11.2. Description of available options by section
3.11.2.1. [global]
Several options are available in the [global] section of the waptconsole.ini file.
Options (Default Value) |
Description |
Example |
|---|---|---|
|
Launches the WAPT Console in debug mode. |
advanced_mode = True |
Allows to reboot the selected host(s) remotely from the WAPT Console. |
allow_remote_reboot = True |
|
Allows to shut down the selected host(s) remotely from the WAPT Console. |
allow_remote_shutdown = True |
|
|
Defines whether the remote repository is using Client Side SSL Authentification. |
client_certificate = C:\private\org-coder.crt |
|
Defines whether the remote repository is using Client Side SSL Authentification. |
client_private_key = C:\private\org-coder.pem |
|
Forces the package certificate’s date and CRL to be verified. |
check_certificates_validity = True |
|
Defines the default upload maturity for WAPT packages. |
default_maturity = PROD |
|
Defines the default prefix for new or imported packages. Prefix is case sensitive, we recommand to use lower case. |
default_package_prefix = doc |
|
Defines the directory for storing packages while in development. |
default_sources_root = C:\waptdev |
|
Lists external plugins for the WAPT Console.
Default is |
grid_hosts_plugins = W3siZXhlY3V0YWJsZSI6ImV4cGxd |
|
Defines a WAPT package list that the WAPT Agent MUST install. |
host_profiles = tis-firefox,tis-java |
|
Disables Hiberboot on Windows 10 to make waptexit |
hiberboot_enabled = True |
|
Defines the address of the proxy server in the WAPT Console. |
http_proxy = https://proxy.mydomain.lan |
|
Provides the date when the WAPT Console was last used. |
last_usage_report = 12/05/2021 18:45:51 |
|
Provides the last user logged on this WAPT Console. |
lastwaptserveruser = admin |
|
Defines the timeout for GPO execution at computer shutdown (in seconds). |
max_gpo_script_wait = 360 |
|
Defines the path to the certificate associated with the Administrator’s private key. |
personal_certificate_path = C:\private\mykey.crt |
|
Defines the timeout for scripts at computer shutdown (in seconds). |
pre_shutdown_timeout = 360 |
|
Defines the address of the main WAPT repository. |
repo_url = https://srvwapt.mydomain.lan/wapt |
|
Allows the WAPT Console to send anonymous statistics to Tranquil IT. Set to False to disable telemetry. |
send_usage_report = True |
|
Lists allowed signature algorithms for the WAPT packages. |
sign_digests = sha1 |
Allows using unit packages. |
use_ad_groups = True |
|
|
Allows using the FQDN rather than the BIOS UUID as the unique host identifier in WAPT. |
use_fqdn_as_uuid = True |
|
Allows using kerberos authentication for initial registration of WAPT Agents with the WAPT Server. |
use_kerberos = True |
|
Allows using host packages. |
use_hostpackages = True |
|
Allows using a proxy to connect to the main WAPT repository from the WAPT Console. |
use_http_proxy_for_repo = True |
|
Allows using a proxy to connect to the WAPT Server from the WAPT Console. |
use_http_proxy_for_server = True |
Allows using replication for repositories. |
use_repo_rules = True |
|
|
Allows verifying SSL / TLS certificate. |
verify_cert = True |
|
Defines the address of the WAPT Server. |
wapt_server = https://srvwapt.mydomain.lan |
Options (Default Value) |
Description |
Example |
|---|---|---|
|
Launches the WAPT Console in debug mode. |
advanced_mode = True |
|
Displays the actions that call external applications (RDP, Windows tools etc…). |
enable_external_tools = True |
|
Displays the button to create self-signed certificates or to create the WAPT Agent’s installer. |
enable_management_features = True |
|
Hides actions that are not available for the WAPT Agent |
hide_unavailable_actions = True |
|
Limits hosts displayed in the WAPT Console. |
HostsLimit = 300 |
|
Forces the default langage for GUI (not for package filtering) |
language = en |
|
Defines the .ini file used to store the WAPT Console configuration. |
lastappinifilename = C:\Users\%username%\AppData\Roaming\waptconsole\waptconsole.ini |
|
Displays the Audit data tab on host inventory. |
show_host_audit_data_tab = True |
Allows using unit packages. |
use_ad_groups = True |
|
|
Forces the use of the FQDN instead of the uuid BIOS as the unique host identifier in WAPT. |
use_fqdn_as_uuid = True |
|
Displays the version of the WAPT Console. |
waptconsole.version = 2.0.0.9424 |
|
Allows displaying the Windows Update tab on the WAPT Console. |
waptwua_enabled = True |
3.11.2.2. [sections]
You may add several external repositories by adding [sections] in C:\Users\%username%\AppData\Local\waptconsole\waptconsole.ini.
Warning
This parameter can be configured both in the WAPT Agent configuration and in the WAPT Console configuration C:\Users\%username%\AppData\Local\waptconsole\waptconsole.ini.
For information on configuring the WAPT Agent, please refer to this point.
See available parameters and configurations by visiting this documentation on setting up multiple repositories.