5. Quickstart - WADS
5.1. Deploying a machine in the domain, with offline connection
In this example, we will deploy a new machine to an Active Directory domain using a USB stick, with an offline connection. In this example we will deploy a Windows 11 machine in version 24h2.
Deployment via USB is recommended for enhanced security. Additionally, the offline connection with DJOIN eliminates the need to pre-create a computer account in Active Directory. It also prevents storing an Active Directory user’s login credentials in the XML file.
5.1.1. Requirements
A raw image of windows 11, 24h2 (downloaded from the official Microsoft website).
The necessary system drivers for your machine to be deployed.
A configured DHCP server.
The WAPT server must be able to exchange with the machine to be deployed.
Have a dns resolution with a domain controller from the console.
Install the WADS-REQUIREMENT-MININAL packages on the wapt console.
User with local administrator rights on the WAPT server.
User who signed the exe files ( Tools > Sign deploy file) and configuration files.
A empty usb stick
Note
Official WADS documentation here
Demonstration video (WAPT 2.2 version):
5.1.2. Creating a WINPE USB stick
Open the WAPT Console.
Insert an USB stick on your computer.
Go to OS DEPLOY panel.
Click on Create WinPE USB stick → (select your usb device).
You can see the master certificate (Add your certificate if you don’t see it). (1)
Choose the keyboard language (for example: fr, en, es, pt, de, etc.) . (2)
Check the other parameters before confirming with OK .
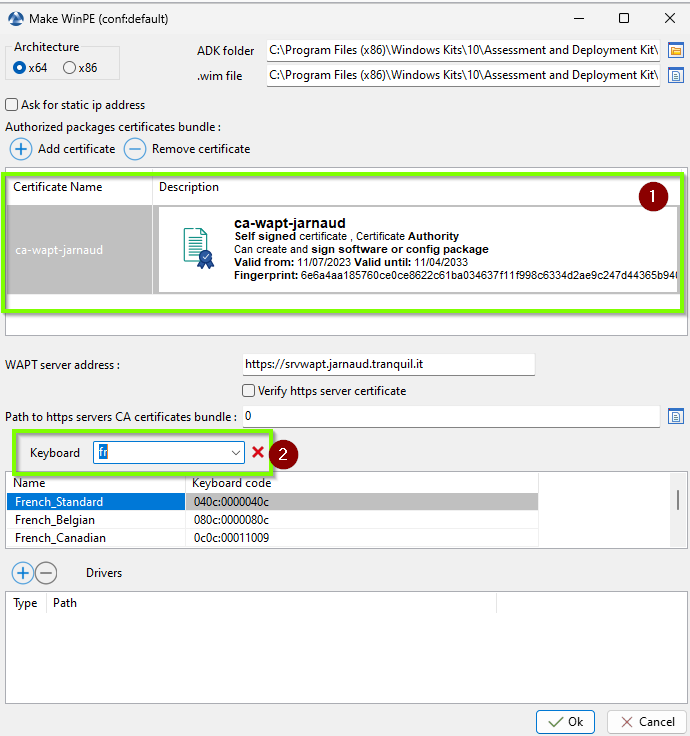
WinPE creation
You need to set up an account with administrator privileges to retrieve the key information twice.
Remove the USB Stick.
5.1.3. Creating a XML configuration
Go to the configuration panel in OS DEPLOY.

Configuration panel
Click on the +.
Choose a configuration name. (1)
Choose your iso. (2)
Choose a configuration file by clicking on the document icon (in this quickstart we recommend offline mode, so we don’t have to create the machine account in Active Directory). (3)
Save, you have created a configuration in WAPT. (4)
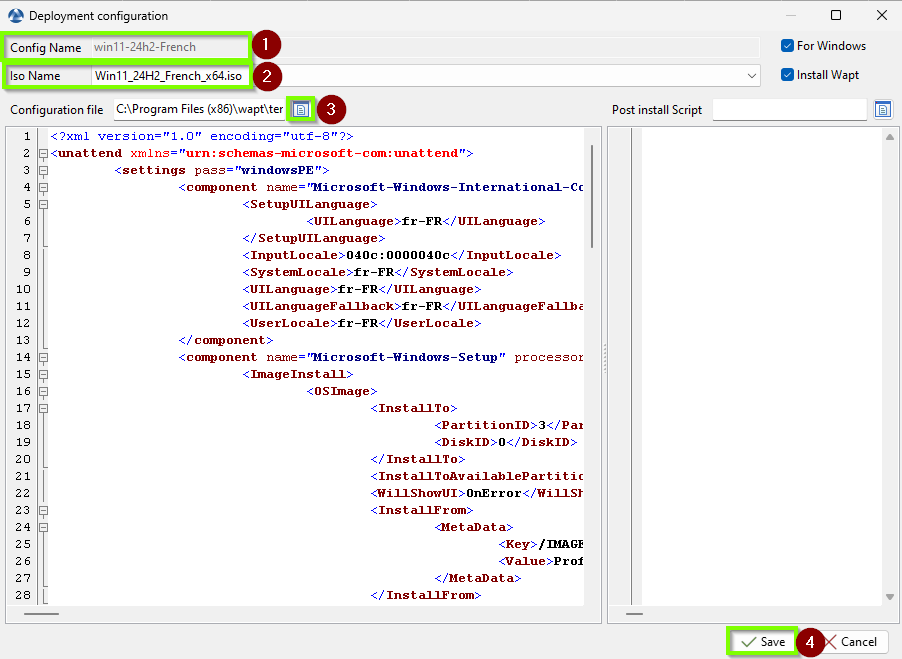
Create a configuration in WADS
The configuration file is done.
5.1.4. Stages in the deployment of a computer
5.1.4.1. On the computer to be deployed
Turn off the machine.
Insert the stick on the computer to be deployed.
Start the computer and charge the boot menu (Use F10 or F12 when the computer starts up ), select your USB stick.
Let the computer start.
A box will appears, inform your login and password and give a name to the computer to be deployed.
A new box appears Registration Successful.
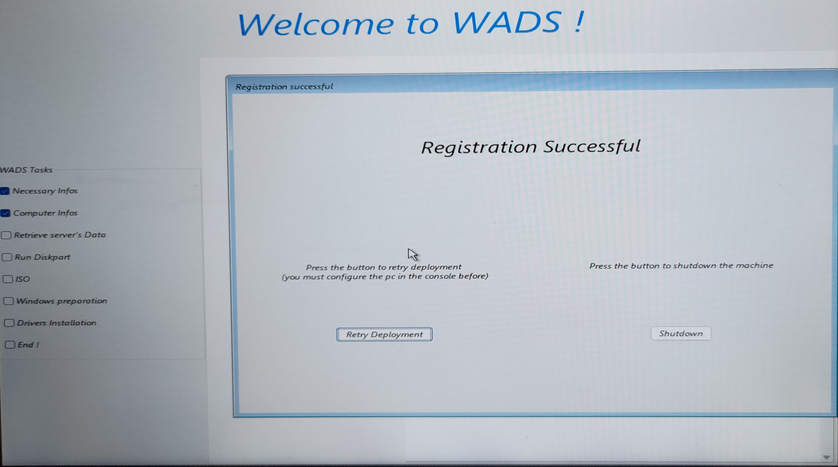
Computer waiting to be deployed
5.1.4.2. On the WAPT console
Return to the OS DEPLOY tab in the WAPT console and do a refresh ( F5).
Select the line of the computer name to be deployed:
Right-click > Select a Configuration, take the configuration you have done previously and OK.
Right-click again> Change Drivers, select your drivers (warning; no exe, only extrated drivers) and OK.
Right-click on the computer to be deployed → prepare Djoin (this allows you to specify in your Active Directory the Organizational Unit where your new machine will be registered).
Fill in the domain. (1)
Fill in the domain controller. (2)
Click on Connect to Domain and Reload OU. (3)
Prefer the overwrite option in order to re-register the computer if necessary. (4)
Select your desired Organization Unit. (5)
Save
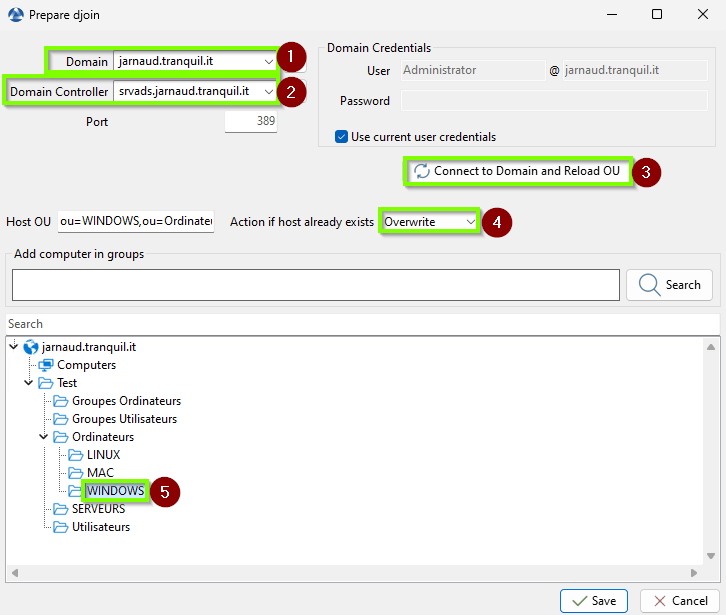
Edit Djoin
The comment Exist appears in the Djoin column.
Select the computer to be deployed > Right-click start Deploy, an X appears in the waiting to deploy column.
5.1.4.3. On the computer to be deployed
Click on Retry Deployment,The deployment will then resume.
Once finished, the machine will restart automatically.
Once the reboot is complete, your machine is ready to go.
WADS deployment is complete and your machine is registered in your WAPT inventory.