Managing the WAPT Agent on Linux and macOS
Deploying the WAPT Agent on Linux and macOS
Note
To install WAPT on a Windows client, the minimal requirements are:
512Mo Ram;
1 CPU;
300Mo Drive space (without package cache).
The procedure depends on your operating system:
Hint
The WAPT Agent for Debian has been tested on Debian 9, 10 and 11.
The WAPT Agent for Ubuntu has only been tested on Ubuntu Bionic and Ubuntu Focal.
Update the underlying distribution and check that apt https transport is installed
sudo apt update && apt upgrade -y
sudo apt install apt-transport-https lsb-release gnupg -y
Retrieve the key .gpg, add it to the Tranquil IT repository and install the WAPT Agent.
sudo wget -O - https://wapt.tranquil.it/$(lsb_release -is)/tiswapt-pub.gpg | apt-key add -
sudo echo "deb https://wapt.tranquil.it/$(lsb_release -is)/wapt-2.3/ $(lsb_release -cs) main" > /etc/apt/sources.list.d/wapt.list

export DEBIAN_FRONTEND=noninteractive
sudo apt update
sudo apt install tis-waptagent -y
unset DEBIAN_FRONTEND
Hint
The WAPT Agent for Redhat based system has been tested on Redhat 7/8/9 and derivatives on x86_64 platforms
Update the underlying distribution.
yum update
Retrieve the key
.gpgand configure the WAPT repository.
RH_VERSION=$(cat /etc/system-release-cpe | awk -F: '{ print $5}')
wget -q -O /tmp/tranquil_it.gpg "https://wapt.tranquil.it/redhat${RH_VERSION}/RPM-GPG-KEY-TISWAPT-{$RH_VERSION}"; rpm --import /tmp/tranquil_it.gpg

cat > /etc/yum.repos.d/wapt.repo <<EOF
[wapt]
name = WAPT Server Repo
baseurl = https://wapt.tranquil.it/redhat${RH_VERSION}/wapt-2.3/
enabled = True
gpgcheck = True
EOF
install the WAPT Agent using yum:
yum install tis-waptagent
Hint
The WAPT Agent has only been tested on Intel architecture and Apple Silicon M1 processors:
Download and install the WAPT Agent (note: the hash string may change, to get the latest, point your brower on the url https://wapt.tranquil.it/wapt/releases/wapt-2.3/). Choose the version depending on your processor architecture (intel or m1):
# for mac m1
curl -o tis-waptagent-2.3.0.13516-69968974-macos-all-arm64.pkg https://wapt.tranquil.it/wapt/releases/wapt-2.3.0.13516-69968974/tis-waptagent-2.3.0.13516-69968974-macos-all-arm64.pkg
# for mac intel
curl -o tis-waptagent-2.3.0.13516-69968974-macos-all-x86_64.pkg https://wapt.tranquil.it/wapt/releases/wapt-2.3.0.13516-69968974/tis-waptagent-2.3.0.13516-69968974-macos-all-x86_64.pkg

sudo installer -target / -pkg tis-waptagent*.pkg
Installing the WAPT Agent configuration file
Before installing the WAPT Agent configuration file, you have to create a initial config for you agent in your WAPT Console.
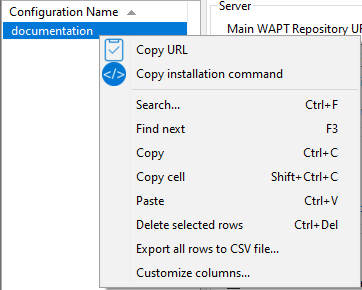
When done, copy the command with the Copy installation command.

Menu list showing the Copy installation command
Then use this copied command prompt on the Linux / macOS agent.
wapt-get add-config-from-url https://srvwapt.mydomain.lan/wapt/conf.d/default_f0288df2131b8dce667b8c34b9999959bdc2d253b3934fcb3be2eabad8a50021.json f0288cf2131b9dce667b8c34b9999959bdc2d253b3934fcb3be2eabad8a50020
Finally, execute the following command to register the Linux / macOS host with the WAPT Server:
sudo wapt-get register
When you have modified the configuration of the WAPT Agent, you should restart the WAPT Agent using the following command:
sudo wapt-get restart-waptservice
Feature matrix
There are some features that are not currently available on Linux and macOS:
installing updates on shutdown (WAPT Exit);
any Windows specific feature.
Particularities with domain functionality
On Linux:
Testing was carried out with sssd with an Active Directory domain and kerberos authentication.
To integrate a host in the Active Directory domain, you can choose to follow this documentation.
In order for Active Directory groups to function properly, you MUST verify that the id hostname$ command returns the list of groups the host is a member of.
Attention
We have noticed that the kerberos LDAP query does not work if the reverse DNS record is not configured correctly for the domain controllers. These records MUST therefore be created if they do not exist.
Old method to configure the WAPT Agent running on Linux / macOS
Attention
Please, see the new method to deploy configuration file instead.
Creating the WAPT Agent configuration file
Hint
Use the WAPT Server FQDN address for the repo_url and the wapt_server arguments.
sudo cat > /opt/wapt/wapt-get.ini <<EOF
[global]
repo_url = https://srvwapt.mydomain.lan/wapt
wapt_server = https://srvwapt.mydomain.lan
use_hostpackages = True
use_kerberos = False
verify_cert = False
EOF
Copying the package-signing certificate
You need to copy manually, or by script, the public certificate of your package signing Certificate Authority.
The certificate should be located on your Windows host in C:\Program Files (x86)\wapt\ssl\.
Copy your certificate(s) in /opt/wapt/ssl using WinSCP or rsync if you are deploying on Linux or macOS.
Copying the SSL/TLS certificate
If you already have configured your WAPT Server to use correct Nginx SSL/TLS certificates, you MUST copy the certificate in your WAPT Linux or macOS Agent.
The certificate should be located on your Windows host in C:\Program Files (x86)\wapt\ssl\server\.
Copy your certificate(s) in
/opt/wapt/ssl/server/using WinSCP or rsync if you are deploying on Linux or macOS.Then, modify in the
/opt/wapt/wapt-get.iniconfiguration file the path to your certificate.And give the absolute path of your certificate.
verify_cert = /opt/wapt/ssl/server/YOURCERT.crt
Hint
Change the .crt file with your certificate name.
Updating the WAPT Agent on Linux and MacOS
For each WAPT Server’s upgrade, you will have to upgrade the WAPT Agents.
To do so, you have to generate the WAPT Agent and deploy it.
Manually
You can install manually the Linux / macOS Agent by following this documentation on installing the WAPT Agent.
Hint
It is the only upgrade solution available for now for macOS and Linux.