Changing the listening port of the WAPT Server
Note
In some cases, it is not possible to install the WAPT Server on a Windows machine because a service already occupies ports 80 and 443.
It is the case if for example, a IIS web service is active on the host (example: anti-virus server, WSUS, web server …).
In that case, we will change the listening port on the Nginx web server integrated to the WAPT Server.
Installing the WAPT Server
The installation of WAPT still needs ports 80 and 443 be available when installing the WAPT Server, so the first step consists of stopping the service that listens on ports 80 and/ or 443 (IIS/ Anti-virus).
launch now the installation of the WAPT Server and follow the post-configuration procedure, but do not launch the WAPT console. If you need guidance, you may follow the documentation to install the WAPT Server on Windows.
now stop the Nginx service and the WAPT service:
net stop WAPTNginx
net stop waptservice
finally, restart the service that listens on ports 80 and/ or 443 (IIS/ Anti-virus / Web server …);
Configuring the new listening ports in the Nginx
open the file
C:\Program Files (x86)\wapt\waptserver\nginx\conf\nginx.confreplace the lines:
listen       80;
listen       443 ssl;
with:
listen       8000;
listen       8443 ssl;
restart Nginx with
net start WAPTNginx;open
C:\Program Files (x86)\wapt\wapt-get.ini;add the port to the specified URL, example:
repo_url=https://wapt.mydomain.lan:8443/wapt
wapt_server=https://wapt.mydomain.lan:8443
restart the WAPT service with
net start waptservice;
Making changes to firewall rules on the Windows devices
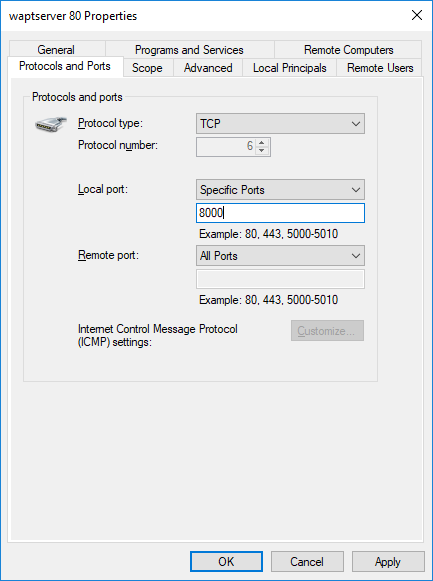
You must now make changes to the two waptserver rules that were created during initial installation: waptserver waptserver 80 and waptserver 443.
change the listening ports:

Changing from port 80 to 8000

Changing from port 443 to 8443
Go on to the next step to launch the WAPT console.
Hint
If you had already launched the WAPT console, do not forget to change the port values in the WAPT console configuration file by clicking the Wrench on the console login screen.